
Might have been the afterglow of my first trip to Chimineas with the Camera Trap Codger that caused the bit to flip - or because I'm a total gadget geek - but I think it was actually a heaping of both, dashed with a dose of dissatisfaction with the poor photo quality of the off-the-shelf trail cameras I've been using - the Reconyx and Moultrie.
With no true optics, a fixed focus, high ISOs, and only 3-6 mega-pixels - they're pretty crappy cameras. It's one in a thousand that you get a truly solid brag shot. But they're simple, can be very fast, and have great battery life - the Reconyx can wake & take a pic per second and be out for months - making them great for surveys and sets where you don't need quality, but surety. Such as when tracking the comings and goings of deer for hunting (I'm told).
So, to fill the quality hole and scratch my hobby-hacker itch, I followed the Codger into the world of "homebrew" camera traps. And I can already say that I'm a happy homebrewmaster for it.
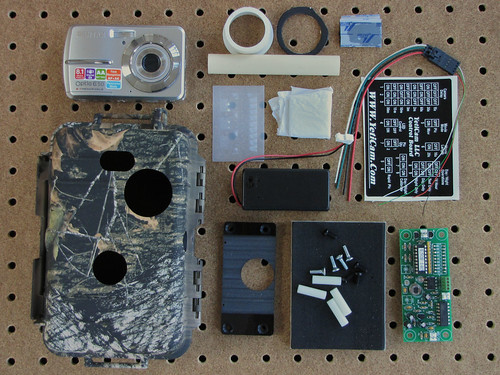
Homebrews are home-built camera traps centered around 3 key ingredients:
- an off-the-shelf point-and-shoot (p&s) pocket camera
- a control card with passive infrared (IR) sensor and microcontroller
- a case, seals, mounts, lenses, battery holders & wires to allow you to make it into a cohesive, working unit
For my first homebrews I decided to try YetiCam. They've got a good rep and their new Pentax-centered kits looked right for my needs. Here's the key features I used for decisioning:
Pentax Optio e50 camera:
- 8.1 mega pixel
- can hack for non-visible ("IR") flash
- AA batteries
- SD card - cheap, tough
- can set and save ISO, EV, zoom, etc. between on/offs
- good camera choices
- good options on controller settings
- small case
- complete
- good instructions
- Codger has found them reliable, easy to use
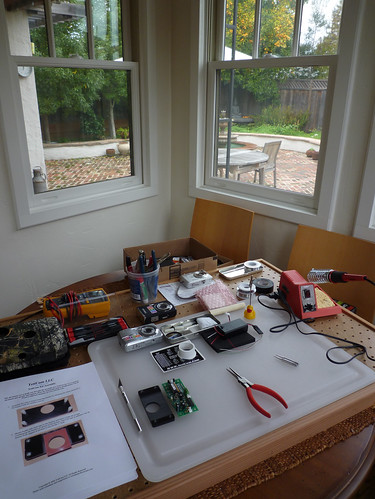
To hack the camera and put together the kit I used:
- a soldering iron with a fine tip
- small screwdrivers, needle nose pliers, wire strippers, x-acto knife...
- a well lit work area
- ability to do fine work with small tools
- time - can take hours per cam trap but gets much easier after first one
- patience - you'll mess things up and wanna redo them
I won't explain the build-out since that's covered in various kit docs, but here's the nutshell:
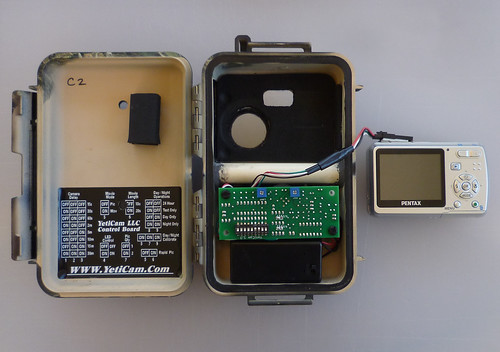
- carefully take p&s camera apart, solder wires to the on/off and shutter switches, put camera back together with the wires exposed
- assemble case, glue in lenses and seals, mount controller card and battery holder
- wire camera and battery to controller card, put camera in case, turn on and start testing
The fully assembled camera trap:
Ready for the field:

Next up: some results!
====
References:
- YetiCam Game Cameras
- Snapshot Sniper
- Camera Trap Codger
- Trailcampro.com
- Camtrapper.com
- Moultrie GameSpy Game Cameras
- Reconyx Cameras
- Digital Photography Review - dpreview.com - Specs for Pentax Optio e50
Thanks for the informative and inspirational post. My pulse always starts racing when I think of building my own homebrew camera and it is great to see somebody else who took the plunge and survived :) Maybe I'll be able to build my own one sometime soon...
ReplyDeleteI'm looking forward to seeing the photos from your camera!
Thanks Henry. I wrote it for folks just like you. Because, if you get better cams, then we get to see better and better pics of all those South African beauties you're chasing! :)
ReplyDeleteSorry to bother you with question, I went to the yeti website to look at Cam kit and notice that the spec are for sony camera not pentax or other, are you doing someting special to be able to use the pentax?
ReplyDeleteNo prob at all, Denis - that's why I wrote the post. Mark at Yeti has Pentax kits, he just hasn't updated his website, so you have to drop him an email and tell him you wanna buy one. He'll tell ya to buy one of the other kits and put "this is for a Pentax e50 kit" in the remarks when you paypal it, or like.
ReplyDeleteQuestion about the pentax e50, do you have tutorial to hack the focus shutter and the power source? thank you for your help
ReplyDeleteDenis
Denis - there is a tutorial for the hack out there. Can't remember where I found it though - might have been the whitetail forums, or like. You just need to do some googling. The Yeti guys may know as well.
ReplyDeletethank you I found 2 video how to hack the pentax E50. That waht I got lately with my bushnell cam. I odn't think the quality is that good
ReplyDeletehttp://dlc-photography.smugmug.com/Other/Trail-Cam/17501056_KgH7f4#1402953213_VN9CrzV-A-LB
Denis - a good cam trapper's quiver needs many kinds of arrows. Bushies are easy to use, have long battery life, and can take some good shots and vids if you can avoid false triggers, sunlight blowout, and IR flash spotlighting (as you've proven). But, having homebrews in the quiver is also handy, especially if you want some higher quality, higher detail shots, and/or need to add a whiteflash to your kit.
ReplyDeleteI agree, I did acquire 4 pentax E50 and soon be buying the yeti kit and hopefully I will set those camera in the hill, thak you for answering all my question
ReplyDeleteHello
ReplyDeleteI got my first kit from Yeti cam to be used with the pentax E50, any advice or tip&trick to assemble before I start my new adventure.
thank you
Denis
Denis - I'd just say take it slow, measure twice and cut once. And the best thing I bought for doing the cam hacks - a magnifier lamp.
ReplyDeletetrust me that the first thing I did. One more question on the servo wire provided by Yeti , it does not say which wire should be power on/off and shutter, I believe hte white one is the common. I appreciate the help
ReplyDeleteDenis
Wire color doesn't really matter much Denis. Matching the connector pins on the controller board is the important thing. It's marked at the connector with P PC S SC for power, power common, shutter and shutter common. Wire to match that, but twist the shutter and shutter common wires together and put both into the shutter connector on the board.
ReplyDeleteAn another question if you don't mind, according to the youtube video by http://www.youtube.com/user/buckshot164#p/u/86/yS8lI_AP6UU, there is a wire for the power wire and one wire for the focus and one wire for the shutter, in the video he has no mention about the fourth wire, how did you hack your pentaz with the fourth wire. I appreciate very much your help and advice
ReplyDeleteThank you
That appears to be a different hack than I did. Sure it'll work though, since in mine, the extra shutter common wire (that your hack doesn't have) is just tied to the shutter wire at the control board connector.
ReplyDelete